
Awesome product photos for your online store doesn’t necessarily mean breaking the bank. You can create gorgeous DIY product photography with just a few simple household items and a decent digital camera or smartphone.
As an online retailer and e-commerce business owner, you know the importance of making your products appealing. When visitors come to your site to see your products, your website is not the only thing that is important. They also need outstanding, gorgeous product photography that draws their attention and help them to make a decision on your product line.
How do your photos look?
If you have product photos on your page, you should analyze the quality of them and try to put yourself in the place of your visitors. Do the photos show your products in the best light or are they a bit lackluster in quality? You don’t want just to throw any photos up online and hope they sell.
According to an MIT study, the brain takes only 13 milliseconds to completely process a photo. This means that you only get 13 milliseconds to completely wow your customer with your product photos.
You should also not take photos and put them up online without running them through some editing process. Just like anything you do with your branding, you should focus on creating the best positive user experience while thinking about how to get the best quality possible.
How to Take Gorgeous DIY Product Photography
Below is a list that you may want to think about when preparing photos to put up online. Try these tips to create your online photos for your e-commerce store.
Use the best camera you can afford.
First and foremost, every picture starts with a good camera. This does not mean that you have to have a $1,000 camera or a $5,000 camera! Many people believe that it has to be the latest equipment or the best brand of the camera on the market. But this is not true.
There is simply no need to go into debt to purchase the latest equipment to take your photos. Any digital camera will do as long as it produces the good quality that is clear and realistic and preferably, in HD quality. If you get a camera with HD quality, you will know that all of your photos will be the best possible quality.
Megapixels do not matter as much as people think provided the quality is good, but higher megapixels do help with overall clarity and allow you to use larger images.
Remember, though; you will use lower resolution on web pictures since larger ones take longer to load and can slow down your website.
You need more light
Before you take your photos, make sure that you have good lighting that will complement your items. Light is everything when it comes to good photography. The absence of light will make your photos dull or listless. Some cameras have compensatory lighting tools that can help you create good lighting if your overhead light is not enough. For items that you are showing closeup, an overhead spotlight is recommended.
If you don’t have extra lighting, that’s okay.
The idea is that if you surround your product with white, the light that you have will reflect off of your product from all angles. This means that you need white from each side if possible. You can do this as simply with white structured paper or material and a chair. If you have a larger product that won’t fit on a chair or small table, try a large white sheet as your backdrop. For smaller products, you can actually create a white box out of stiff foam.
Always opt for natural light if you can. Artificial light can have yellow or blue tints that won’t represent your product in the best or most truthful way. Also, where your product is in relation to that light is extremely important. If you have the light behind the camera, you’ll cast shadows on your product. If the light is behind your product, you’ll see absolutely nothing.
Try to get the light to the side of your product for best results. On the opposite side of your product, you should have something that’s bright white so that it will reflect the light from the natural source back onto your product.
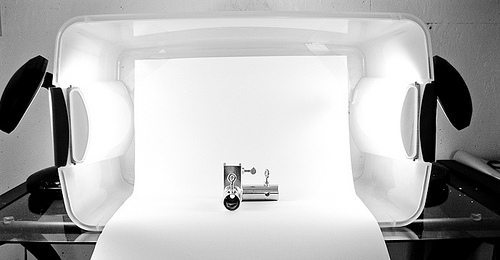
The setup in the above photo will give you a clean white background where your product can take the spotlight. Having white lights on either side provide a soft light all the way around your product which is less harsh and better represents the object.
You don’t necessarily need professional and expensive equipment. However, if you use professional tactics that respect the rules of great photography, you’ll come out with a great photo that will well represent your product.
If you have larger product, this can also be done by attaching a white sheet to a wall. You can create the side panels with a simple clothes rack. For example, you can pick one up at IKEA for about 10 bucks.
Picking up a few of these and attaching a white sheet to them with clothes pins should do the trick. Just make sure the one that’s behind your product has a longer sheet so you get the constant white background effect.
Take several photos that show different angles and represent the product well
For online sales, people are used to the eBay model. This means they want to see a variety of photos from different angles that show your product in the best way. Take a head-on shot, as well as one from both sides and the back if you have an item that has a lot of detail. Some extreme closeups are also necessary to show people the thing up close so that they can make a buying decision.
Use top-quality editing software that does the job
Stephen Spielberg once said that a movie is made in the editing phase, not the filming. This can also be applied to your digital photos for your online e-commerce store. Get a good editing program like Adobe Photoshop, which is a standard for excellent editing quality.
If you cannot afford this program, shop around for another one that does basic editing and enhancements. Adobe currently has a great deal that allows you to use their software like Photoshop, Illustrator, and Premiere for a low cost of only $9.99 per month. This may be well worth it over time as it gives e-commerce store owners access to some of the best editing software available to improve your images.
Alternatively, open-source programs like Gimp will do the trick too. What you basically need to be able to do is crop the photo, if necessary, adjust the brightness, contrast, and color tones (if your picture came out either too blue (cool) or too yellow (warm). Keep your filters in check though- the object is to create a photo that represents your product truthfully and also looks nice. A photo that looks great but misrepresents your product will only lead to returns.
How to Get the Best Quality
When you are taking photos for your online store, you need to focus on quality. People don’t come to your online store to see photos on a conscious level, but they notice if your photos don’t meet their expectations. If they are hazy or hard to see, customers may get frustrated and move on to another site. If you offer products that your competitors also offer, they may choose to see the product on your competitor’s site. For this reason, it’s important to make sure that the quality of your photos is the best that it can be to represent your products.
Study your competitors’ sites
One thing you may want to do to improve your photos on your e-commerce site is to review your competitors’ e-commerce sites. This may give you an idea of how their shopping site is successful and inspire you to think of ways to present your products in the best way possible.
This is not to say that you should copy what your competitors are doing. But it may give you some general ideas on what works and what doesn’t.
Ultimately, you should present your products in a way that fits your style as a brand, and that does not veer from the style of your branding and your website.
How Product Photos Vary from Other Types of Photography
When it comes to creating the best photography for products, you should think about how product photography differs from other types of photography. For example, photography that is taken of landscapes or people is created for a different purpose than product photography. In essence, product photography is for the purpose of selling. This requires creating a desire in the minds of the visitors who see the photographs, and you should always keep this in mind when taking pictures of your products.
DIY Product Photography
If you decide to take your product photo yourself, you should first know your product. The more you know about the positive aspects of your product, the more you will know what you should focus on when you take pictures of your products. Zoom in on the most important qualities of a given product so that your will be showing potential customers the best aspects of the product.
This will inspire a desire to purchase the product by giving customers plenty of detail about the product that they crave when they are interested in buying a product.
Your photos can mean the difference between a client deciding to buy and one who does not purchase. Whether you choose to hire it out or do it yourself, keep the idea of quality foremost in your mind with your DIY product photography to ensure that the result will be something that will draw customers to your online products.
Practice makes perfect. Try taking a few sample photos and editing them before creating the final photos that will be featured in your online store. Shoppers are visual so make sure you give them something to look at.
What are your best DIY product photography tips? Tell us below or tweet us!